
The Best Photo Spots on the Everest Base Camp Trek offer some of the most breathtaking landscapes in the Himalayas, making the journey a dream for photographers and nature lovers alike. From panoramic mountain viewpoints to colorful Sherpa villages and ancient monasteries, every stage of the trek presents unforgettable photo opportunities. Some of the most iconic locations include Namche Bazaar, Hotel Everest View, Tengboche Monastery, Dingboche, Everest Base Camp, and Kala Patthar, where trekkers can capture spectacular views of Mount Everest, Lhotse, Nuptse, Ama Dablam, and the Khumbu Glacier.
The best photo shots on Everest Base Camp is not just a necessity but in fact mandatory. You have come here for adventures, for new experiences, and most of all for photographs that will tell you stories when people see Mount Everest hanging at your wall.
But it is not easy to get the most out of your camera on this trek. You need to know where to stand, when to shoot, and what to look for at each location to get good pictures.
This guide will tell you every major photography spot from Lukla to Base Camp. You will also get the gear advice, seasonal tips, and composition basics that will help you return home with shots and a heart full of memories.
The Everest Base Camp Trek offers you many standout photo locations, two perfect shooting seasons, and the practical techniques that will help you in your shoot.
Read the entire content before you pack your bag for Everest Base Camp Trek.
A quick overview of the Everest Base Camp Trek
You will see a quick overview before we know about the photo spots at Everest Base Camp. Take a look below:
Starting Point | Lukla (2,845 m) which reaches by a short flight from Kathmandu |
|---|---|
Ending Point | Everest Base Camp (5,364 m) |
Duration | 12 to 14 days for a round trip |
Difficulty | First moderate than its challenging |
Terrain | Forest trails, river valleys, moraine paths , and rocky high-altitude ground |
First Everest View | From the ridge above Namche Bazaar (3,440 m) |
Note :You do not need any climbing experience, but good fitness matters on this Everest trek.
The trail takes you through Phakding, Namche Bazaar, Tengboche, Dingboche, Lobuche, and Gorak Shep before you reach Everest Base Camp.

Each stop has its own character and its own photo opportunities. Look wisely and take a perfect snap.
Best photo spots on the Everest Base Camp Trek
Who doesn’t want the perfect snaps, right ?
If you have already been on the way to Everest and it is not the first time, you already know the perfect spot. But , if you are a first-time trekker, then below Mountain Routes will give you the perfect spots.
Lukla Airport Landing
Your first photo moment happens before you even start walking. Tenzing-Hillary Airport in Lukla is one of the most dramatic and also dangerous airports in the world.
You will find the runway very short and steep. Mountains sit directly ahead. Just take out your camera and take a real shot.
You can take a clear picture for :
- Snow-capped ridges and valleys from the side of your plane window.
- The runway and terminal building are on arrival at the airport.
- Trekkers and porters gather outside with their gear .
Shooting tips for you:
- Book a window seat . If you don’t know this, the left side of the plane always gives the best mountain views anywhere.
- Have your camera out and ready before landing.
- Shoot in burst mode during the final descent.
You can choose the short type as an aerial landscape or a wide-angle documentary. It is under your preference.
Suspension Bridges from Phakding to Namche
Between Phakding and Namche Bazaar, the trail makes you cross several long suspension bridges over the Dudh Koshi River.
These bridges look beautiful with colorful prayer flags everywhere. They swing slightly as trekkers and yak trains pass over them.
Once you reach this point , you can take pictures for:
- Prayer flags against a blue sky
- Trekkers or yaks mid-crossing
- The river flowing below through the bridge cables is very pleasing.
Composition tips for you.
- Stand at the bridge entrance and shoot straight down the length . The cables here form strong leading lines.
- Shoot from the center of the bridge for a symmetrical frame.
- Wait for a person or animal to enter the frame for scale and life. It looks candid and perfect.
You can shoot in Landscape, leading lines, and motion modes. It is completely up to your preference.
Phakding Riverside & Monjo Village
This is the early part of your trek. You will see the most peaceful forest and river scenes.
Be prepared to shoot the turquoise Dudh Koshi River that flows through pine forests, wooden bridges, and traditional Sherpa houses in Monjo.
This is perfect if you need relaxed, natural landscapes and village life shots before the big mountains come your way.
Tip: You can get the best pictures during morning time as the light filtering through the trees works beautifully here.
Namche Bazaar Viewpoint
Namche Bazaar is the main stop in the Khumbu region. It is also the acclimatization spot for trekkers here. After a short climb above the town, this place leads to a ridge .
Then it offers you one of the first clear views of Everest on the route.
If you are at Namche , on a clear morning, you can see Everest, Lhotse, and Ama Dablam together from a single spot.
There are many scenes you can shoot while you are here, like :
- Everest rising behind the nearer ridges.
- The town of Namche spreads across the horseshoe valley below.
- Wide panoramas of the full Khumbu range, which is absolutely beautiful.
Shooting tips for you:
- You have to arrive at the viewpoint before sunrise if you want a beautiful shot . The mountains has an amazing aura, or say light in the first 20 minutes of dawn.
- Bring a warm layer because it is cold on the ridge before the sun rises in the morning.
- Use a wide-angle lens if you want to capture the full panorama of the town and peaks together.
You can shoot at a wide-angle landscape or a sunrise panorama, which is completely your preference.
Phakding Riverside & Monjo Village
This part of the trek will give you the most peaceful forest and river scenes.
You can shoot the turquoise Dudh Koshi River flowing through pine forests, wooden bridges, and traditional Sherpa houses in Monjo.
This spot has the relaxed, natural landscapes and village life shots before you can actually see the giant mountains.
Note: You can take pictures early in the morning because the light at this time is worth it.
Tengboche Monastery
Tengboche Monastery is located at 3,867 meters, which is at an altitude. Ama Dablam, Everest, and Nuptse all rise behind these monastery walls.
This destination is much more famous comparatively. It is also one of the most photographed religious sites while trekkers are on the Everest Trek.
Once you reach here , you can capture a picture for:
- The monastery faces mountains directly behind.
- Monks in red robes in the courtyard.
- Prayer wheels, butter lamps, and carved stone details.
- Incense smoke is floating across the entrance.
Shooting tips for you:
- You have to arrive at sunrise when the first light falls on both the monastery and the mountain walls behind it.
- You can also use a longer focal length to capture. This compresses the monastery against the mountain backdrop.
- Make sure you always ask permission before you photograph monks or religious ceremonies. Without permission, it might be offensive.
- Return at dusk for a different mood . At this time, the light turns deep gold just before dark.
You can shoot the cultural backdrops, architectural stuff, and landscapes you find.
Pangboche & Deboche
After you cross Tengboche, you stop at Pangboche Monastery. It is also one of the oldest monasteries in the Khumbu region and the beautiful Deboche area.
You can get peaceful monastery shots, river crossings, and stunning Ama Dablam views .
This place offers you an intimate cultural photography , atmospheric forest, and mountain scenes.
You will also find the place very calm as there are fewer people here.
Dingboche and Ama Dablam Views
Like other places, Dingboche is at 4,410 meters, which is an open valley. This is where the landscape shifts .
The trail moves above the green forests, and you start seeing views that open up in every direction.
Ama Dablam dominates the skyline here. Its twin ridges and hanging glacier make it one of the most special peaks in the world.
Once you reach here, you can click pictures of :
- Ama Dablam with the clear blue sky
- Stone walls, yak herders, and village buildings everywhere
- Wide valley shots with layers of ridges shrinking into the distance
Shooting tips for you:
- You can click pictures during golden hour . This is 30 to 45 minutes after sunrise or before sunset.
- Use foreground elements like stone walls to add depth to the frame.
- A telephoto lens separates Ama Dablam cleanly against the sky.
- Shoot in RAW for better control over bright snow highlights in the mountains.
Note: You can click on a wide cinematic landscape or a telephoto mountain portrait for good pictures.
Kala Patthar
Kala Patthar is the most famous place above all. It sits at 5,545 meters and is also the highest point on the standard EBC trekking route.
You will get the clearest and most direct view of Mount Everest from anywhere on the trail.
The Khumbu Icefall, the South Col, and the summit pyramid are all visible from the Kala Patthar.
Once you are over this place , click pictures of :
- Everest at sunrise, which looks breathtakingly beautiful behind the summit
- Trekkers on the ridge against the peak
- Full panoramas of the mountains everywhere .
Shooting tips for you:
- You have to leave Gorak Shep before 4:30 a.m. to reach the top by sunrise . The views are not good if you reach there by day.
- The weather here is very cold. So, dress in your warmest clothes to protect yourself.
- Make sure you keep spare batteries inside your jacket .
- Also, ensure that you use a tripod for long-exposure sunrise shots . Don’t forget to carry one.
You can click pictures of iconic landscapes, sunrise silhouettes, and wide panoramas, according to your preference.
Now, look at the differences between Sunrise vs Sunset at Kala Patthar.
Time | Pros | Cons | Recommendation |
|---|---|---|---|
Sunrise | Dramatic colors, popular | Everest face in shadow | Most trekkers choose |
Sunset | Direct light on Everest face | Colder , fewer people | Better for mountain detail |
Night Photography at Kala Patthar & Gorak Shep
The high altitude at Kala Patthar at night has very dark skies. On clear nights, try star trails or Milky Way shots above the Himalayas. It will be perfection.
Tips: For your shoots, you can use a tripod and manual mode (15–25 sec exposure, ISO 3200–6400). You can shoot after 8 PM when most lights are off.
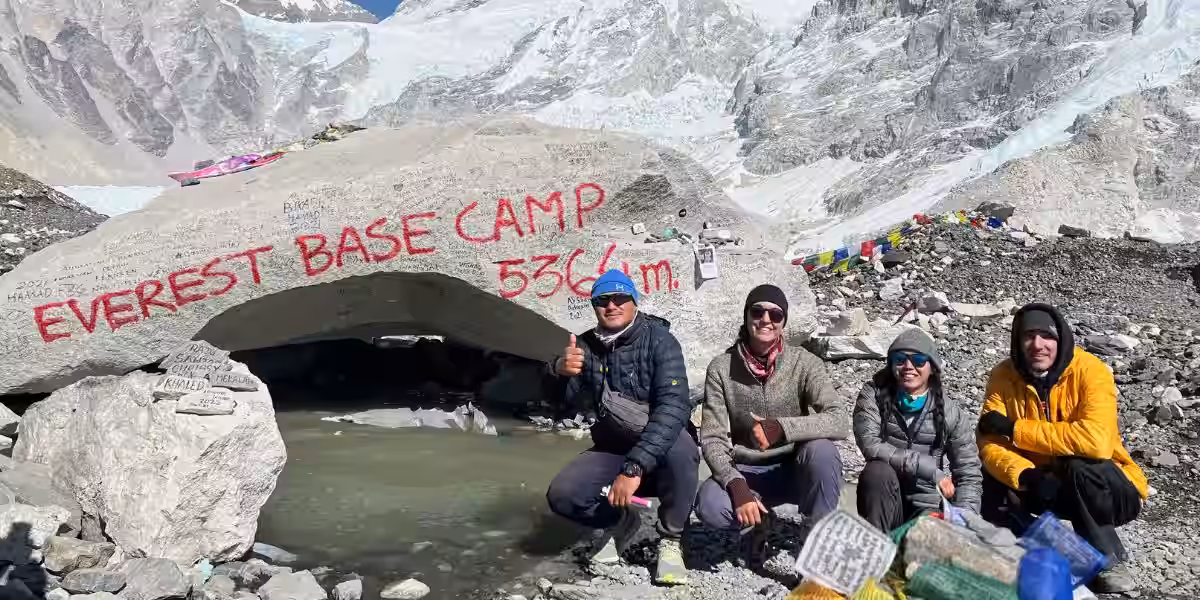
Everest Base Camp
Everest Base Camp is at the height of 5,364 meters on the surface of the Khumbu Glacier. This is the ultimate destination to reach on the entire trek.
You will find the terrain rough and rocky and scattered with brightly colored expedition tents everywhere. Especially if you go during the spring climbing season. This is also the peak season.
You will see prayer flags stuck in every direction, which is very beautiful to see.


Note : Everest itself is not visible from Base Camp. Nuptse blocks the view from this angle. So, be prepared .
Once you reach here, you can click pictures for:
- The Base Camp signboard, which is the most photographed marker on the trek.
- Expedition tents that are expanded all over the glacier
- Prayer flag lines against the sky, which looks beautiful for shots
- Fellow trekkers at the moment of arrival, which feels real, and is unposed and planned.
Shooting tips for you:
- Focus on storytelling rather than landscapes at this spot.
- The finish line moment is a powerful subject, so you can photograph the people around you.
- Look back toward the Khumbu Icefall for dramatic ice and sky captures.
You can shot as for documentary, portrait, storytelling. It is completely under your preference.
Khumbu Glacier and Icefall
The Khumbu Glacier expands from Base Camp down through the valley.
Near the Base Camp, you can walk to the glacier's edge and see the Khumbu Icefall . This is a broken river of ice blocks, towers, and deep blue crevasses. The ice here moves and shifts every day. Here you can get your shot worth it.
Once you reach you can click pictures for:
- Ice textures with cracks, layers, and compressed snow patterns.
- Tall ice towers called seracs.
- Blue light inside crevasses and ice walls.
- The full scale of the icefall is viewed from a distance.
Shooting tips for you.
- Shoot in the early morning when low-angle light brings out texture in the ice surface.
- You can use a medium focal length for close-up ice detail.
- Also, adjust white balance with ice in shadow, which reads very blue, so account for this when exposing.
You can shoot as abstract, close-up texture, wide landscape on your preference.
Best time for photography on the EBC Trek
You have to always choose the right season or right time while trekking. Trekking anywhere needs dedication and effort beyond. Below you can see when to trek:
Spring (March to May)
The spring season is one of the peak season where you will find more number of trekkers. The temperature is also favorable with clear blue sky. Try to explore in the morning. You will also find rhododendron flowers blooming everywhere.
Autumn (September to November)
Like Autumn, spring is another season for Everest Base Camp. You will get the most stable weather during this autumn.
The mountain views with deep blue skies look just beautiful everywhere. Autumn has slightly cooler temperatures, which adds color to the valley scenes.
Shooting by time of day
Time of Day | Light Quality | Recommended |
|---|---|---|
Sunrise (6 a.m -7 a.m ) | Warm, directional , dramatic | Best (plan most of the shots here) |
Morning ( 7a.m-10 a.m) | Soft and clear | Good for trekking and candid shots |
Midday (10 a.m- 3 p.m ) | Harsh, flat, washed-out | Avoid for landscape and photography |
Golden hour (4 p.m -5 p.m) | Warm, low angle, rich color | Excellent for afternoon shots |
A note on weather: Clear mornings in the Himalayas can cloud over fast. If you see good light, shoot it immediately. Do not wait.
Photography gear for the Everest Base Camp Trek
You have to be very selective when it comes to your gear.
Gear choice on the EBC trek is a balance between quality and weight. If you want your quality pictures, we can help you well:
Camera Options
Camera Type | Best For | Drawback |
|---|---|---|
Mirrorless (Sony A7, fuji X -T5) | Best quality, lighter body | Expensive |
DSLR | Excellent quality, good battery life | Heavier |
Smartphone (iPhone 15 Pro, Pixel 8) | Lightweight , always accessible) | Limited in low light |
Lenses
Not everyone will tell you this, but if you want a perfect shot, choose the lenses below:
- Wide-angle (16–35mm)
You can shoot the mountain panoramas, monastery architecture, and village scenes at this angle.
- Standard zoom (24–70mm)
This is flexible for most everyday situations on the EBC trail.
- Telephoto (70–200mm or longer):
This is good to capture isolating distant peaks, portraits of monks, and trekkers.
Must-Have Accessories
- Spare batteries (minimum 2 extras):
Cold drains batteries fast . Make sure you store spares inside your sleeping bag overnight to avoid the problem.
- Memory cards:
Bring at least 128 GB of total storage . The cards are not available above Namche.
- Lens cloth:
Dust and condensation are constant issues on the trail. Use a lens cloth to protect your camera.
Optional but useful for Everest Base Camp Trek
- You can also use a small travel tripod for sunrise shots at Kala Patthar and Namche viewpoint.
- Also, use a UV or circular polarizing filter to reduce mist and deepen sky tones.
- Waterproof dry bag or padded case insert for your camera bag.
Practical Photography Tips for the EBC Trek
While you are on this Everest journey , you need to know some practical tips.
You have to expose correctly for Snow and Ice. For this :
- Use exposure compensation (+0.7 to +1.3 stops) to keep snow looking white, not grey.
- Use the Rule of Thirds
- You can add people for scale and story.
- Keep your camera ready for your shots
- Shoot in RAW
- Respect local culture
- Check your histogram after each shot
- Avoid blinking highlights on the mountain peaks.
Wildlife & Local Life (Storytelling Shots)
Look beyond landscapes, like you can click pictures of yaks carrying loads, Himalayan birds, porters on the trail, smiling Sherpa children in villages, and daily monastery life.
These human and wildlife elements give soul to your Everest pictures.
Tip: Always ask permission and move slowly for natural moments.
Additional must-visit photo pots & side Trips
The Everest journey will not disappoint you. There are many places that give you incredible shots. If you are a serious photographer, you might not want to miss these additional side trips:
Syangboche / Everest View Hotel
This is also one of the World’s highest hotels, which is in Nepal. You will get to see the unobstructed Everest panorama. The view looks absolutely stunning at sunrise.
Chukung Ri (5,550m):
Once you reach above Dingboche, you will see the dramatic views of Ama Dablam, Makalu, and Island Peak. It looks splendid from everywhere.
Khumjung & Kunde Villages:
Here you will see the traditional Sherpa villages with monasteries and the Yeti skull. Click shots for prayer flags and the sides of trails.
Pangboche Monastery:
This Pangboche Monastery is older and more atmospheric than Tengboche . You can take this opportunity for cultural shots.
Nagarjun Hill (above Namche)
You can visit Nagarjun Hill as an alternative viewpoint with fewer crowds.
Ama Dablam Base Camp side hike (from Dingboche)
If you want close-up glacier and peak views, then the Ama Dablam Base Camp side hike is absolutely for you.
Note : These are important because it gives you variety and “hidden gem” images that most trekkers miss without knowledge.
Suggested day-wise photography Itinerary for you:
In case you don’t know what to shoot on your trek, below is the short and simple photo itinerary for you :
Day 1-2: Lukla landing and Phakding bridges
Day 3: Namche sunrise from the viewpoint and afternoon at Syangboche
Day 5: Tengboche golden hour
Day 6-7:Take pictures at Dingboche . Shoot Ama Dablam and the Chukung Ri acclimatization hike.
Day 9: Kala Patthar sunrise (pre-dawn departure)
Day 10: Everest Base Camp and Khumbu Icefall
Tip: You can plan rest/acclimatization days around sunrise/sunset windows at Everest Trek.
High Altitude Photography Challenges & Solutions
Trekking to an altitude is a very difficult task. It is fun but comes with major challenges.
Especially at 5,000m and above, photography becomes physically demanding:
For your clear pictures, keep such things in mind:
- For lens condensation, you can use silica gel packs and lens warmers.
- For battery drain, you can keep spares in the inner pocket/sleeping bag where you can easily pullout.
- For hypoxia & focus, you can take slow, deliberate shots. Don’t forget to use manual focus.
- For UV radiation that affects the sensor, you can use a UV filter.
- For your breathing while shooting, you can use a tripod or brace yourself to avoid camera shake.
Weather, Permits, Safety & Contingency Plans
There are certain things that you need when you trek to Everest, like :
- Sagarmatha National Park Permit required.
- You can trek during weather windows like Spring (Mar-May) & Autumn (Sep-Nov). The weather is good.
- If you find the weather at Kala Patthar, you can backup for the Gokyo Lakes trek or wait one day for clear weather.
- Always carry altitude sickness medication and do not ignore symptoms.
- Also, download offline maps and have an emergency contact for your safety.
Conclusion
The Everest Trek gives you more images than you can plan for. If you want your pictures to look good, wake up early at every stop.
The golden light on the mountains in the first hour of the day gives you good Himalayan pictures. Move at a steady pace. Look around. The best shots on this trek come to those who are patient and prepared.
If you want to plan your EBC trek around the best photography windows, Mountain Routes can help you build an itinerary . We will help you choose the right place and the right time.
Get in touch with Mountain Routes today to start planning your Everest Base Camp Trek.


No comments yet. Be the first to share your thoughts!